Set up your workspace
Add your name and photo, pick your language and time zone, and set your workspace's name, logo and workflow in Settings.
5 min readUpdated November 7, 2026
Video lesson: Workspace Basic Setup
Overview
Before you invite your team or your first client, take a few minutes to make the workspace yours. Your name and photo show on every comment and invite, your time zone decides when a deadline falls, and the workspace name and logo are what your clients see.
Everything on this page lives in Settings. Your own profile is yours to change whatever your role; the workspace-wide settings are for admins.
Open Settings
- Click the gear icon at the bottom of the left sidebar, just above your avatar. (Your avatar → Settings opens the same window.)
- Pick a section on the left, then a tab in the strip at the top of the pane. The sections are Profile, Notifications, Workspace, Team & permissions, Clients & portal, Review & media, Workflow and Integrations — you only see the ones your role can use.
- Change what you need. Nothing is saved until you click Save Changes at the bottom; Discard throws your edits away.
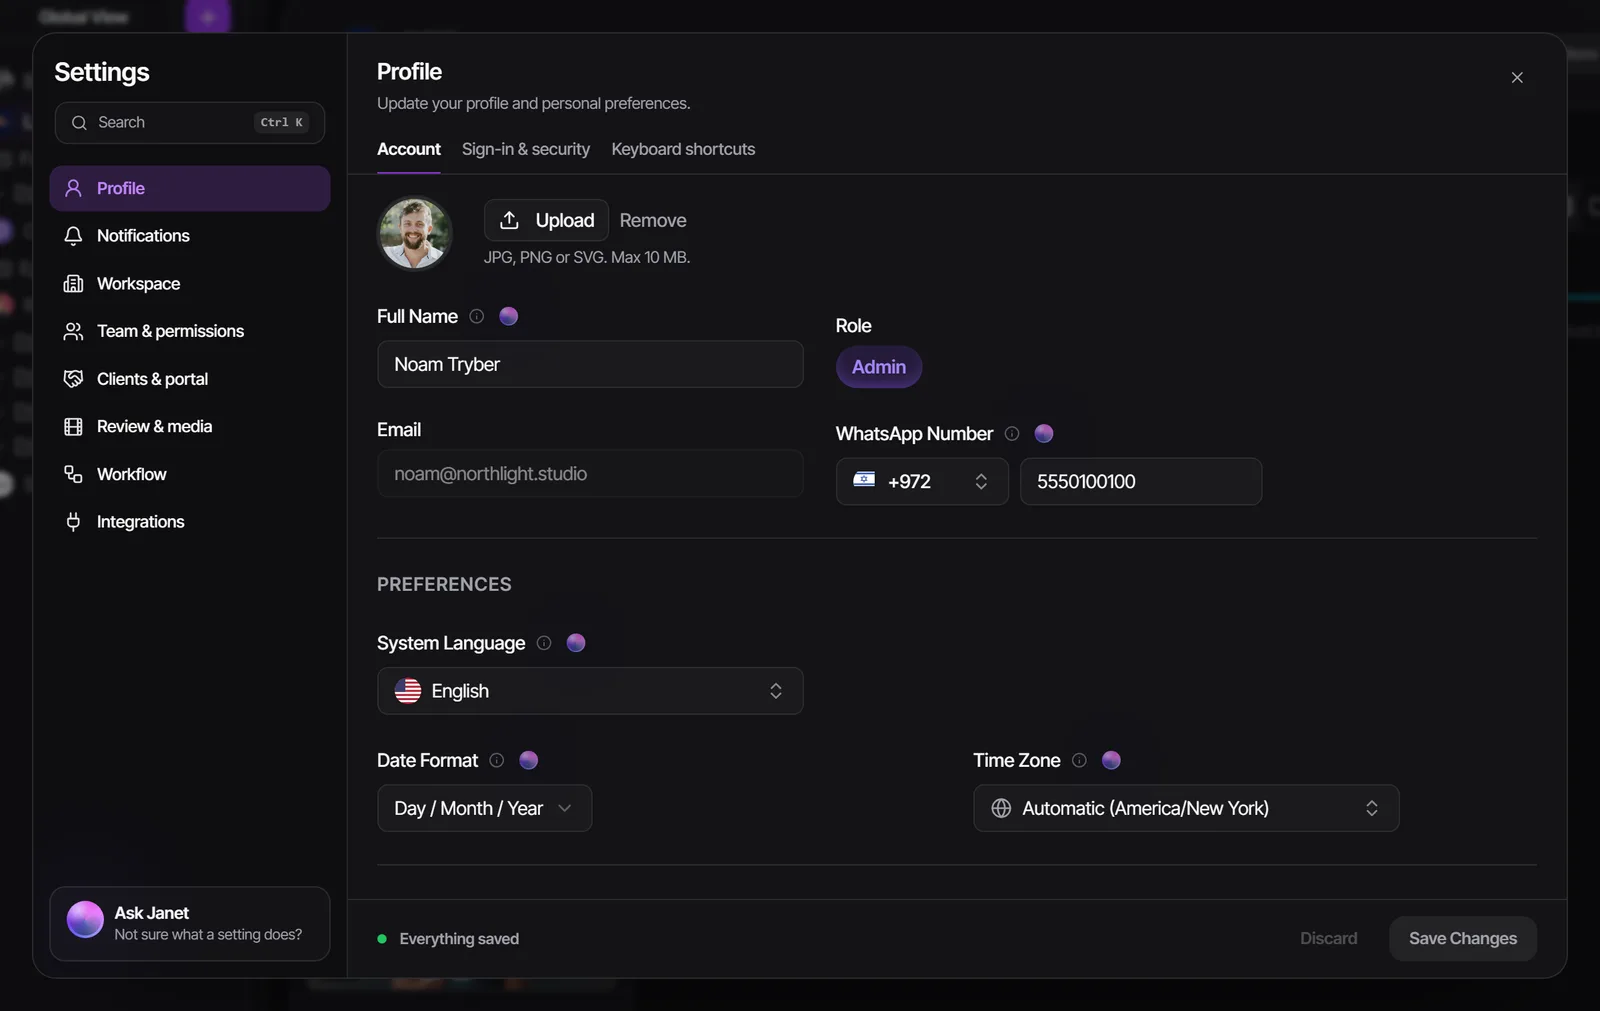
Looking for one setting? Type in the search box at the top of the Settings list (Ctrl+K, or Cmd+K on a Mac). It finds whole panes and single settings, then scrolls to the row.
If you leave a pane or close Settings with unsaved changes, Timeliner asks first: Cancel keeps editing, Discard drops the changes, Save and continue saves them.
Set up your own profile
These settings only affect you. Each person on the team, clients included, sets their own.
- Go to Settings → Profile → Account.
- Click the photo circle to upload a picture, then fill in your Full Name so clients and editors know who they are talking to.
- Add your WhatsApp Number if you want WhatsApp notifications.
- Under Preferences, pick your System Language, your Date Format and your Time Zone.
- Under Views & navigation, use My views to reorder your views. The view at the top is where you land after signing in, marked Lands here.
- Click Save Changes.
The app is available in 11 languages: English, Spanish, Portuguese (Brazil), German, Dutch, French, Hindi, Russian, Chinese (Simplified), Hebrew and Arabic. Hebrew and Arabic switch the whole layout to right-to-left.
The language of your emails and messages is set separately, under Notifications → Personal → Notification Language. See Notifications.
Secure your sign-in
Settings → Profile → Sign-in & security holds Change Password, Change Email and Two-factor authentication.
- Click Set up two-factor authentication.
- Scan the QR code with an authenticator app such as Google Authenticator, Authy or 1Password.
- Type the 6-digit code from the app and click Verify & enable.
- Save the backup codes it shows you. They are shown once, and each one works once if you lose your phone.
Changing your sign-in email sends a confirmation link to both the old and the new address. The change happens only after both are confirmed.
Name your workspace and add your logo
Admins set the workspace's identity. The name and logo appear in the app, in your client portal and in invite emails.
- Go to Settings → Workspace → Basics.
- Under Identity, type the Workspace Name and upload a Workspace Image, or switch on Use my profile photo as workspace image.
- Click Save Changes.
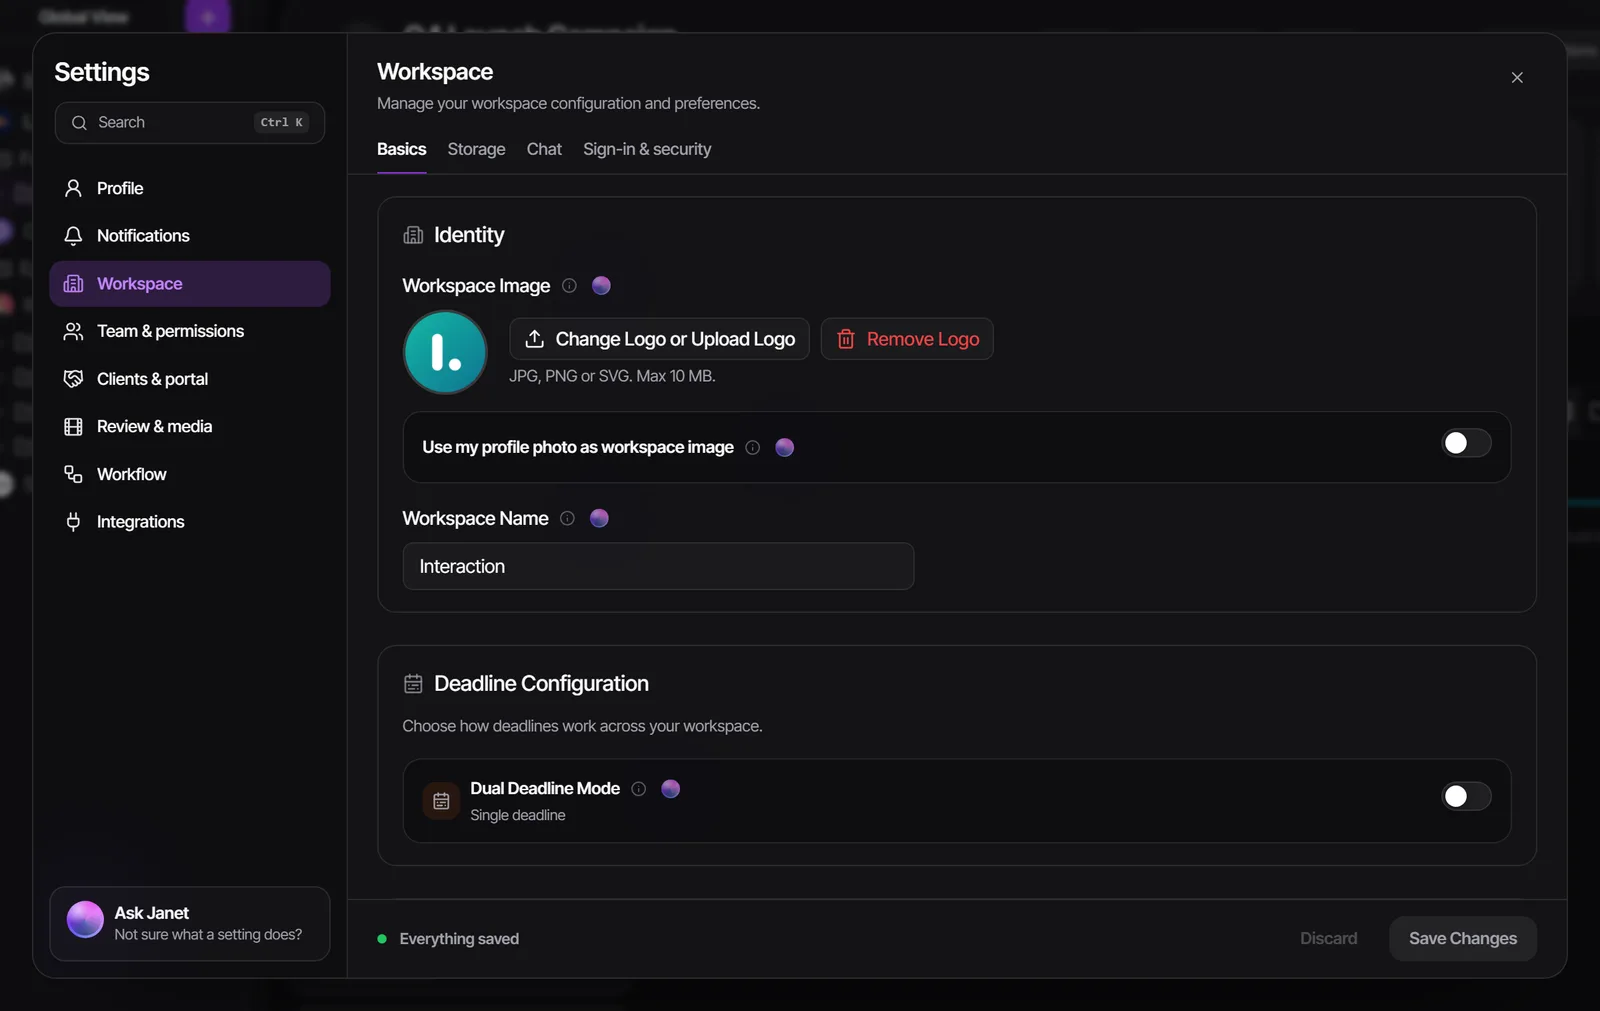
The same pane holds a few more workspace-wide choices worth a look on day one:
- Dual Deadline Mode (under Deadline Configuration) — gives each task a second, team-only internal deadline next to the client-facing one.
- Enable task IDs — gives every task a short permanent ID, with your own Prefix, that you can quote in an email or a call. Clients don't see it.
- Welcome emails — what invite emails say, set separately for Client invites and Team member invites, including an optional Personal note (optional).
- Default sidebar sort — how brands and projects are ordered in the sidebar for anyone who hasn't picked their own sort.
- Announcement banner — one message across the app and every client portal, such as a holiday closure. Agency plan and up.
Choose your workflow
Your workspace's statuses come from a workflow template. The template is usually picked for you during setup from your business type — an agency with client approval, a solo workflow or an in-house team review — and an admin can change it.
- Go to Settings → Workflow → Statuses.
- Pick the template that matches how you work. Advanced workflows holds the longer approval chains.
- Click Customize on the template card to switch optional statuses off or to Customize Status Names to your own words.
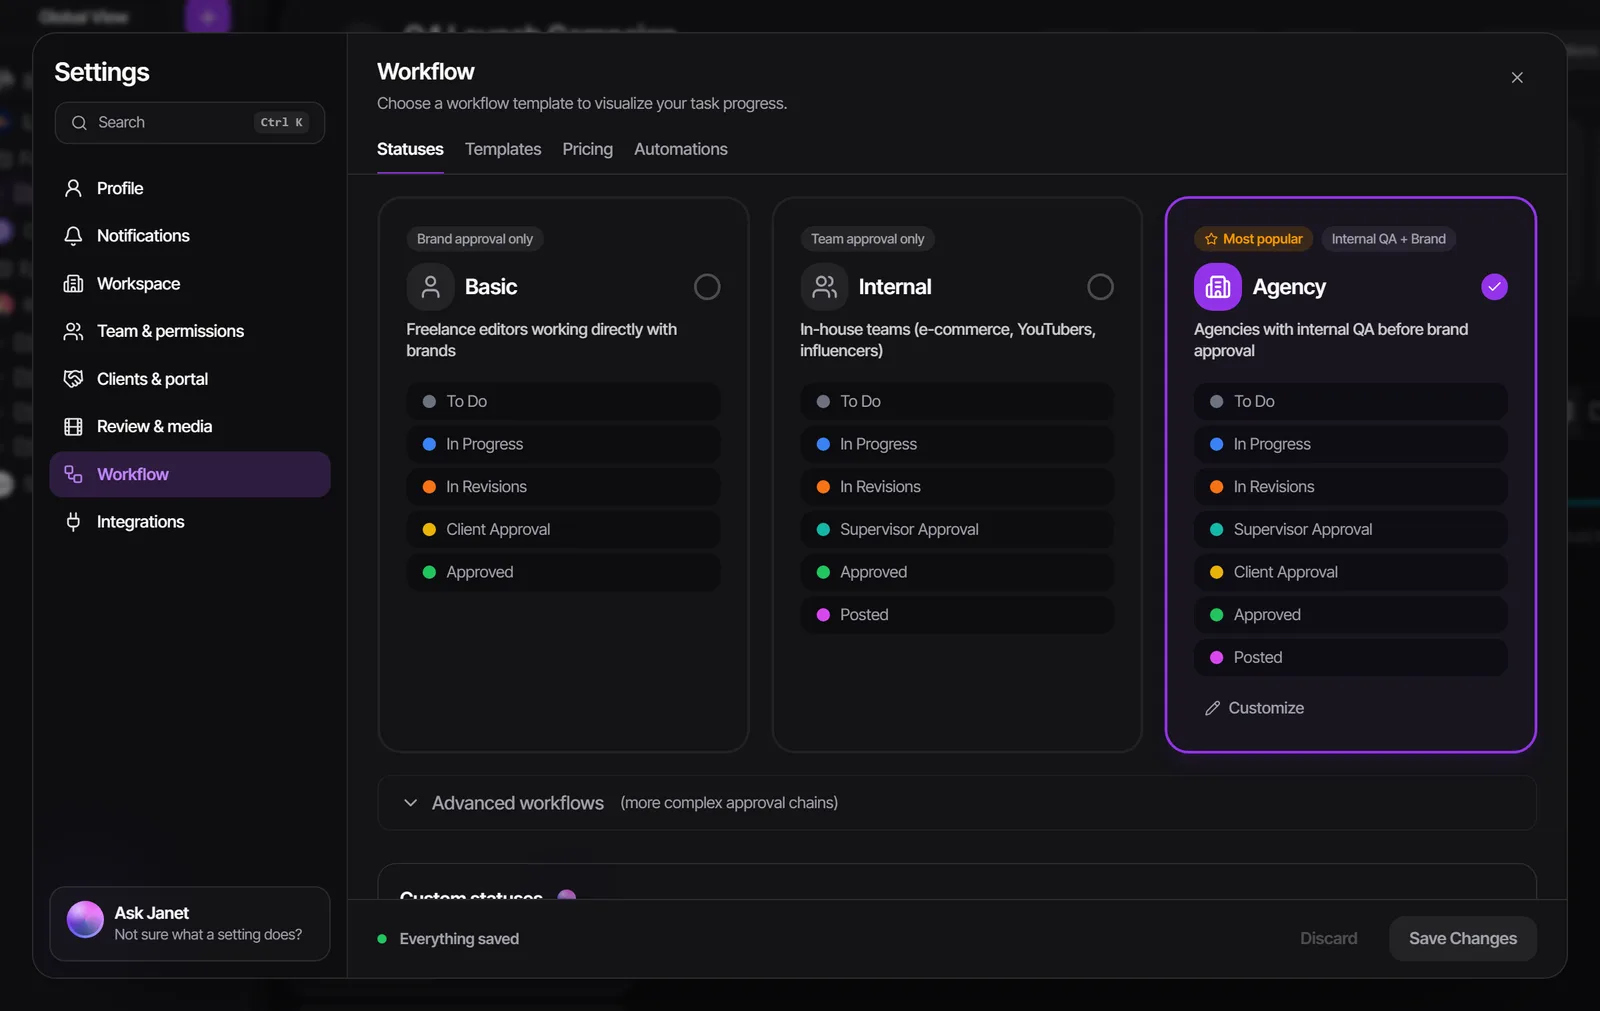
Switching templates warns you when tasks sit in statuses the new template doesn't have. Read the warning before you confirm. More in Approval pipeline and statuses.
Dark or light
Timeliner opens in dark mode. To change it, click More actions (the three dots in the top bar) → Switch to light mode, and the same item reads Switch to dark mode to go back. Your choice is saved to your account, so it follows you to every device.
Who can do this
| Settings area | Who sees it |
|---|---|
| Profile (account, sign-in, keyboard shortcuts) | Everyone, clients included |
| Notifications → Personal | Everyone |
| Workspace → Basics | Admins |
| Team & permissions → Members | Admins and supervisors |
| Team & permissions → Permissions | Admins |
| Workflow → Statuses | Admins |
Editors see only Profile and Notifications. A tab above your plan shows a small lock and opens behind an Upgrade card.
Not sure what a setting does? Every row has a small ⓘ with a one-line explanation, and a Janet icon beside it that asks Janet about that exact setting. Ask Janet at the bottom of the Settings list opens her on top of Settings.
Questions people ask
Why can't I see the Workspace section in Settings?
Workspace-wide settings are for admins. Supervisors and editors see their own Profile and Notifications, and supervisors also see the team list.
I changed a setting but nothing happened.
Settings are saved only when you click Save Changes at the bottom of the window. Until then the footer counts your unsaved changes.
Can each person use a different language?
Yes. Everyone picks their own System Language in Profile → Account, and their own Notification Language for emails and messages.
How do I rename my workspace?
An admin goes to Settings → Workspace → Basics, changes the Workspace Name and clicks Save Changes.
What if I lose the phone with my authenticator app?
Sign in with one of your backup codes. If those are gone too, a workspace admin can reset two-factor authentication from your row in the team list.
Still stuck?
Ask Janet, the assistant inside Timeliner, email our team, or ask the community on Discord. We answer every message.