Learn Timeliner in 15 Minutes · 0:00 Five tools, one flow
If your content and creative production runs on project management tools like Monday, Notion, ClickUp, Asana, approval tools like Frame.io, Dropbox Replay, Vimeo, scheduling and posting tools like Metricool, Buffer, you're paying for five or more tools just to ship one piece of content in your agency or in your company. And someone in your team is spending hours every week copy-pasting between all these tools and looking for missing files.
In the next 15 minutes, I'll show you what replaces all of it. One flow. The script, raw footage, the edit, the approvals, every version, the post, and the results. I'm Noam, founder of Timeliner.
Learn Timeliner in 15 Minutes · 0:44 Brands and projects
Let's go. Okay, so this the dashboard. Here on the left you can see all of your clients. Each one can be one-time client, retainer client, your own internal content, whatever it is. We call them brands. Let's open one, Rebecca Studio. She's a creator and my team makes her content every month. Inside a brand you can have projects. Each project can be a different month of a retainer, a different campaign, a different type of production, however you guys want to work, but basically you name it however you want.
Learn Timeliner in 15 Minutes · 1:11 Inside a task
Now, let me show you what a task actually looks like. Every task runs through four steps, right here on top. Plan, edit, review, and publish. In plan, you have the brief, the brand guidelines, and the files for this exact video. And you can link the exact raw footage this video needs, so your editor doesn't dig through the whole shoot. Edit is where our editing service picks it up, if you use it.
Review is where all the feedback lives. Every version and every comment. And publish is where it gets scheduled, once it's approved. And with layout, you decide how the task looks. Side by side, focus mode, which panels are open. Save it for yourself or for the whole team.
Learn Timeliner in 15 Minutes · 1:51 Organizing a client by month
For Rebecca, this how I personally recommend you to do it. Every project is a month. This one is October, so when she ask what you guys made me in October, it's one click. And inside a project, I can split it even more because each month of our retainer, I give her different deliverables. So, I don't want it to mix up. So, I do sub folders, ads, organic statics, animations, podcasts, whatever you guys do.
I click ads and I only see the ads of this month.
Learn Timeliner in 15 Minutes · 2:16 Brand and project headers
Now, look at the top. Every brand and every project has a header and they do different jobs. The brand header is the stuff that is true forever. Whatever project I'll ever do for this client, guidelines of how to work with him, onboarding for new editors, how she likes her captions, what fonts she use, colors, logos, B-rolls, links to her website, social media. So, each new editor that joins the account, whether is a human or an agent, I need to re-onboard him.
He reads it once and I don't need to do a 40-minute call to explain him what to do. The project header is just this month, the October brief, how many videos, what we're pushing, the references, what we did in the film day, and this the month's raw footage. So, a brand header, who is she? Project header, what we're making right now. And every card has its own permissions.
Just your team or her too, who from your team can see each of these cards. So, for example, in the brief, I will say, "Hey, create five short-form videos, take inspo from this edit." And then they can access all the raw footage.
Learn Timeliner in 15 Minutes · 3:19 Raw footage
And basically, this is where more most setups fell apart because people mix deliverables, raw footage, assets. Here is very organized. So, for each project, you have the raw files and assets. You can arrange it by folders or just drag a whole card from the shoot right in. It splits into big files into pieces and send them into same time. So, it moves really fast. We have the fastest upload speed in the market today.
It runs in the background. You can keep working and even if the Wi-Fi drops for a second, it will retry and keep going instead of starting from zero. So, that's very powerful. And once it's in, your editors will automatically be notified. They read a brief, download the raw footage, and start working. No one like, "Can you send me the drive link?" And no editor is burning their own drive storage on your client's footage.
If you want, you can also mark sections of your raw footage and create tasks out of it for your editors if you want to help them know where are the highlights of your specific shoot.
Learn Timeliner in 15 Minutes · 4:14 The production pipeline
Every video, every image, audio, PDF, most common obviously video that you need to approve becomes a task and that moves through the pipeline. To do, in progress, or you can rename it however you want, scripting, to do, in progress, supervisor approval, which is basically internal QA before it gets to the client, client approval, approved, post, and in revisions is whenever something goes back. The rules are built in, it's plug and play, you don't need to do crazy automation.
So, for example, an editor can only move a video up to supervisor approval, they can't send something half-baked straight to your client. Only you or your supervisor can move it into client approval, and the client can only download it once it's approved. Now, what I hated mostly in tools like Monday or ClickUp is that I never had like a top view. I was jumping between tons of folders and boards to understand what's going on in my business, and I just want to wake up in the morning and see everything.
So, here, I click a project, I only see stuff that is part of this project. I click on a client, I will only see stuff of that client. All these projects in the same time. And if I click on global view, I see everything from everyone. So, I wake up, I see, "Hey, this guy sent these four videos back to revision. This guy sent these. These are waiting for my internal approval.
Let's go one by one so I won't be the bottleneck. These are waiting for my editor. What is the deadline? It's late. Okay, let's talk to him, see what's going on." It's the same data but different views. So, I have list, I can see it in Kanban view, calendar of what goes on, workload if I want to plan and sync the calendars of my editors, videographers, see who is available and be able to commit more realistically to deadlines.
Learn Timeliner in 15 Minutes · 5:53 Video review and comments
Now, let's go to the more fun part. Okay, let's review. So, for example, I click on this short five in ads. My editor just moved it into supervisor approval and I got automatically notified in WhatsApp and Slack. I open it, this is the review. Okay, I pause anywhere I want and I can write in the exact frame. Okay, zoom in. You can draw on the frame, make this red.
Okay, I can select a range, the music is too loud here. You can attach a file. Hey, it can be whatever file type I want. B-rolls, lots. And for example, hey, add this new logo of the client, upload it and then the editor can download the original right here from the comment. So, I need to tell him in WhatsApp, you know. And if I'm too lazy to type, I can just hey, add this wish sound effect we talked about.
And then it can then transcribe it and they can read it. Now, every comment is internal or public. Internal stays with your team and my client will never see it. There is also a transcript, so if I click on a word, it jumps there. Or if I select a sentence, I can comment on the word. For example, remove this part. Now, when I'm done, I click send to revisions and the editor automatically gets notified.
So, no more did you see my message or needing to copy paste anything. So, they don't have excuses. They get notified where they're actually available at. On their side, every comment jumps to its time code. So, they can export it all as markers directly into Premiere, DaVinci Resolve, Final Cut. And when they fix it, they automatically upload a new version into the same task.
Learn Timeliner in 15 Minutes · 7:21 Comparing versions
Now, to be honest, a week later, you probably don't even remember what comments you left to your editor. So, you quickly might want to make sure that it's actually fixed. So, for example, I go to this from July, add feed 51, version two just came in. So, I compare version one and version two side by side and my note from version one on top of it. So, for example, here I told him make the colors more warm and I see that it's actually fixed.
Now, if everything is good, I can move it to client approval.
Learn Timeliner in 15 Minutes · 7:50 AI quality control
Now, before video even reaches me, there is one more step I'm really excited about and this is like the future to replace tools like Frame.io completely. So, the AI check. We call it the timeline or supervisor. It goes through the video for the stuff that eats your supervisor's day. There's many supervisors needs to watch 50, 100 videos a day. So, a caption that doesn't match what's said, a name that is spelled bad, a hook that starts too late, black frames, sound dropping.
Okay, it analyzes the video and leaves the comments for you, and then the supervisor can just focus on watching it like a client, okay? And then I can suggest a fix, and it goes to the client when everything is well baked. Now, I can set it up to run automatically on each new version, so the editor fixes the technical stuff before a human even opens it. Your supervisor can watch it as a viewer and gives creative notes, and that's where you want to have your best people.
>> So, if this looks like a great solution for you when you finish the video, feel free to click on the link in the description and get access to a 14-day trial. You don't need to commit, just play around and see if it's a good fit for your team. And when you sign up, feel free to book an onboarding call with our team, one-on-one with a human, we'll help you set everything up and answer all of your questions.
Okay, let's keep going.
Learn Timeliner in 15 Minutes · 9:06 AI editing
>> So, we just sent the notes back to an editor, but what if the fix doesn't need a human editor at all? Two ways. The first is our editing service. It mixes AI and human editors, depending on when you watch this video, maybe it will be fully embedded in the software, we will offer you this as a service, but basically you can look on us as an editor, let's call him Ronald, okay?
You can tag him, our AI editor, on a task. He reads the brief, he reads the guidelines, the footage, gets the assets from you, all the past editor edits you approved, what you consider as a good version, what your client likes, what not, and then he will edit the video for you fully, okay? You don't need even to wait two, three days for a human to do it, and he will restore the edit for you.
Obviously, this will improve as models improve. Currently, it does 80, 90% of the job, depending on your editing style, but this can save you a lot of time and money. The second is a mix of humans and AIs. So, we have an MCP, it's very powerful, it can fully connect to Claude GPT, connect your own workspace, so the agent can read the comment on a task with time codes connected to your editing software, too, cuz now many softwares like DaVinci Resolve, Premiere, After Effects have an MCP that allows agents to edit in the timeline.
So, it can fix the timeline based on the time coded comments in Timeliner, export inside of your editing software, and automatically upload it into the relevant tasks inside of Timeliner. Okay? The same task and then your supervisor gets notified, make sure everything is fixed, and so on. So, the loop becomes the client leaves notes, the agent applies them, you check, they're you're reviewing instead of re-editing.
Learn Timeliner in 15 Minutes · 10:49 What your client sees
Now, what does my client actually see? What does Rebecca see in this case? And this really matters because clients many time are technophobic. They don't want an account, they don't remember their password, they don't like new software, they don't want to download anything, okay? So, let's set it up myself. Name, logo, email, WhatsApp, Slack. And when a video to client approval, she gets a link, she taps on it and for on her phone, opens it up, no need for sign up.
Okay? It's branded with your own logo. She never sees your editor's names, internal communications, only the round that was relevant to her. She doesn't see previous stuff, okay? Just what's waiting for her approval in a beautiful portal that you can design for her. She comment on the frame like we did and then approve or send to revisions. Can be on the laptop as well. Bigger thing, obviously, doesn't have to be only videos, also images, of course.
And she can download it only once it's approved. So, no more client downloading the draft with a typo and posting, all that, okay? So, we save them a lot of time. And your clients are unlimited on every plan. They never take seat.
Learn Timeliner in 15 Minutes · 11:59 Scheduling and posting
Once it's approved, it doesn't need to go anywhere else because you post from here. You don't need to download it and upload it manually to Instagram or to to who is like Metricool. Think of how annoying it is for your client to get a Google Drive link, download it on their phone, open Instagram, think of a caption, cover, when to post it, then they forget about it.
Many clients don't even post the stuff you make for them. You can just do it for them and charge more for it, okay? You can securely connect their accounts once, Instagram, TikTok, YouTube, Facebook, LinkedIn, X and Threads maybe already when you watch this video will be live, but they're coming very soon. On the video, you can publish the AI automatically analyzes the image or video to its transcripts, takes some screenshots, see how they wrote, how this client wrote posts before in their socials, and then she writes the captions in their own voice, in their own style that you won't look like AI slop.
Pick a style, rewrite it, or you write it your own. Real feed, story, the cover, the time, schedule. And by default, only approved videos goes out, so it needs to actually be approved, okay? Now, Instagram trial reels is very powerful. A trial reel is shown to people who don't follow you first, so you first taste of you can first test your clients or your own your own brands' videos on strangers without it hitting your followers' feed.
You can do crazy stuff with MC, editing different hooks to a video, then telling to Claude, "Hey, schedule it with a trial reel," and then decide the winner. That can be insane and give better results to your own brand or to your clients. Turn on post as trial reel, then choose share it to your followers yourself, or let Instagram share it automatically if it performs well. Everything you schedule lands on the calendar, too.
Your client can see it, and when she texts you, "What When is it going live?" The answer is already in our portal. It gives better client experience to your clients cuz they can just see the calendar and what's going to be posted when.
Learn Timeliner in 15 Minutes · 14:01 Analytics and Janet, our AI assistant
And last thing is analytics, super important. Most agencies, from small to big, are not aware of this stuff. So, you can see who is always on time, who is on delay, how long each stage really takes in your production, how many videos you ship a month, what's approved, what's not, how much you owe each editor. And on the social side, the most powerful what works for each client, for what post.
And you don't even need to dig in. You can ask Janet, our AI, or just connect your Cloud or GPT with the MCP, and then basically ask what's late this week. What type of videos work best for my clients? Help me make more scripts based on what worked best. And it has all the analytics. So, that's insanely powerful.
Learn Timeliner in 15 Minutes · 14:41 Getting started
So, that's Timeline there, guys. Raw footage, even the edits, AI quality control, human quality control, scheduling and posting to social media, all the project management stuff, list, Kanban, workload, calendar that you get in any other tool, but specifically for content production, into one place, all integrated to your Slack, to your WhatsApp, so you don't need to copy-paste between them. Everyone gets notified where they're actually available at.
So, go ahead, try it for free for 14 days. Click the link above or below to get access. Book your onboarding call. We have the best support in the market. I'm really proud of it. We have humans that will help you in any step. If you're worried that you already super into tools like Frame.io, Shade, Dropbox, monday.com, Metricool, don't worry. We had team in your side or much bigger teams with 80 editors, with giant workflows, a lot of terabytes.
We helped them fully migrate from these other tools. We can offer you this service and in less than a week have your workspace ready for you exactly with your automations, your storage, your clients, your data. And honestly, I don't want your money if you don't really use it, okay? So, use the trial properly, run a real project from A to Z just to get a grip on it and get confident with the software.
When you do that, you'll know it's a good fit, and then we can help you move everything inside. If you have any questions, feel free to write in the comments. I personally read one by one and will help you with whatever you need.
How Timeliner Works
Hey, it's Noam, founder of Timeliner. So — in the next two minutes I'll show you how Timeliner is built, so everything after this just clicks. Here's the whole idea in one sentence: every client, every video, every round of feedback — in one place. Not five different tools.
On the left, these are your brands. Basically — your clients. And every brand gets its own projects inside. Um, a shoot day, a monthly retainer, a campaign. Whatever fits how you work.
Inside a project, up top, you keep the brief and the raw files — right next to the work. And below, you've got tasks. A task is one deliverable. One reel, one ad, one thumbnail. Each with its own deadline, and the editor who's on it.
And every task moves through your pipeline. To do, in progress, internal approval, client approval, revisions — all the way to approved, and posted.
Click any task, and everything about it is in one place. The video, the brief, the deadline, who's working on it.
Hit open review — and this is where feedback happens. Your client clicks right on the frame, leaves a comment, or draws on it, and it's pinned to that exact moment.
And your client gets all of this through a simple link. No login, no account, nothing to install. Honestly, that alone kills, like, most of the WhatsApp back and forth.
Now let's zoom out. Global view puts every client together. And if you think visually, switch to Kanban. Same tasks, but now you see exactly what's stuck, at a glance.
And every deadline and post date lives on one calendar.
So that's the whole system. Brands, projects, tasks, and the pipeline they move through. In the next lesson, we'll set up your workspace. See you there.
Workspace Basic Setup
Okay. Before you invite your team, or your first client, let's take two minutes and make this workspace yours.
Everything lives in settings. Click your avatar, down here — and open Settings.
Start with you. Add a photo and your full name, so your clients and your editors know exactly who they're talking to.
Then pick your language. Timeliner speaks ten of them, from Spanish to Hebrew — and everyone on your team picks their own.
Set your date format and your time zone too, so a deadline means the same thing for everyone — wherever they are.
Change anything here, and hit Save Changes, down at the bottom.
Now open Workspace. Um, this is your agency's identity. The logo and the name your clients see on everything you send them.
And one last thing. Dark mode, or light mode? I'm a dark mode guy, but — it's your call.
That's it, your workspace is ready. Next up, we'll create your first brand and bring your team in.
Create Your 1st Brand & Add Members
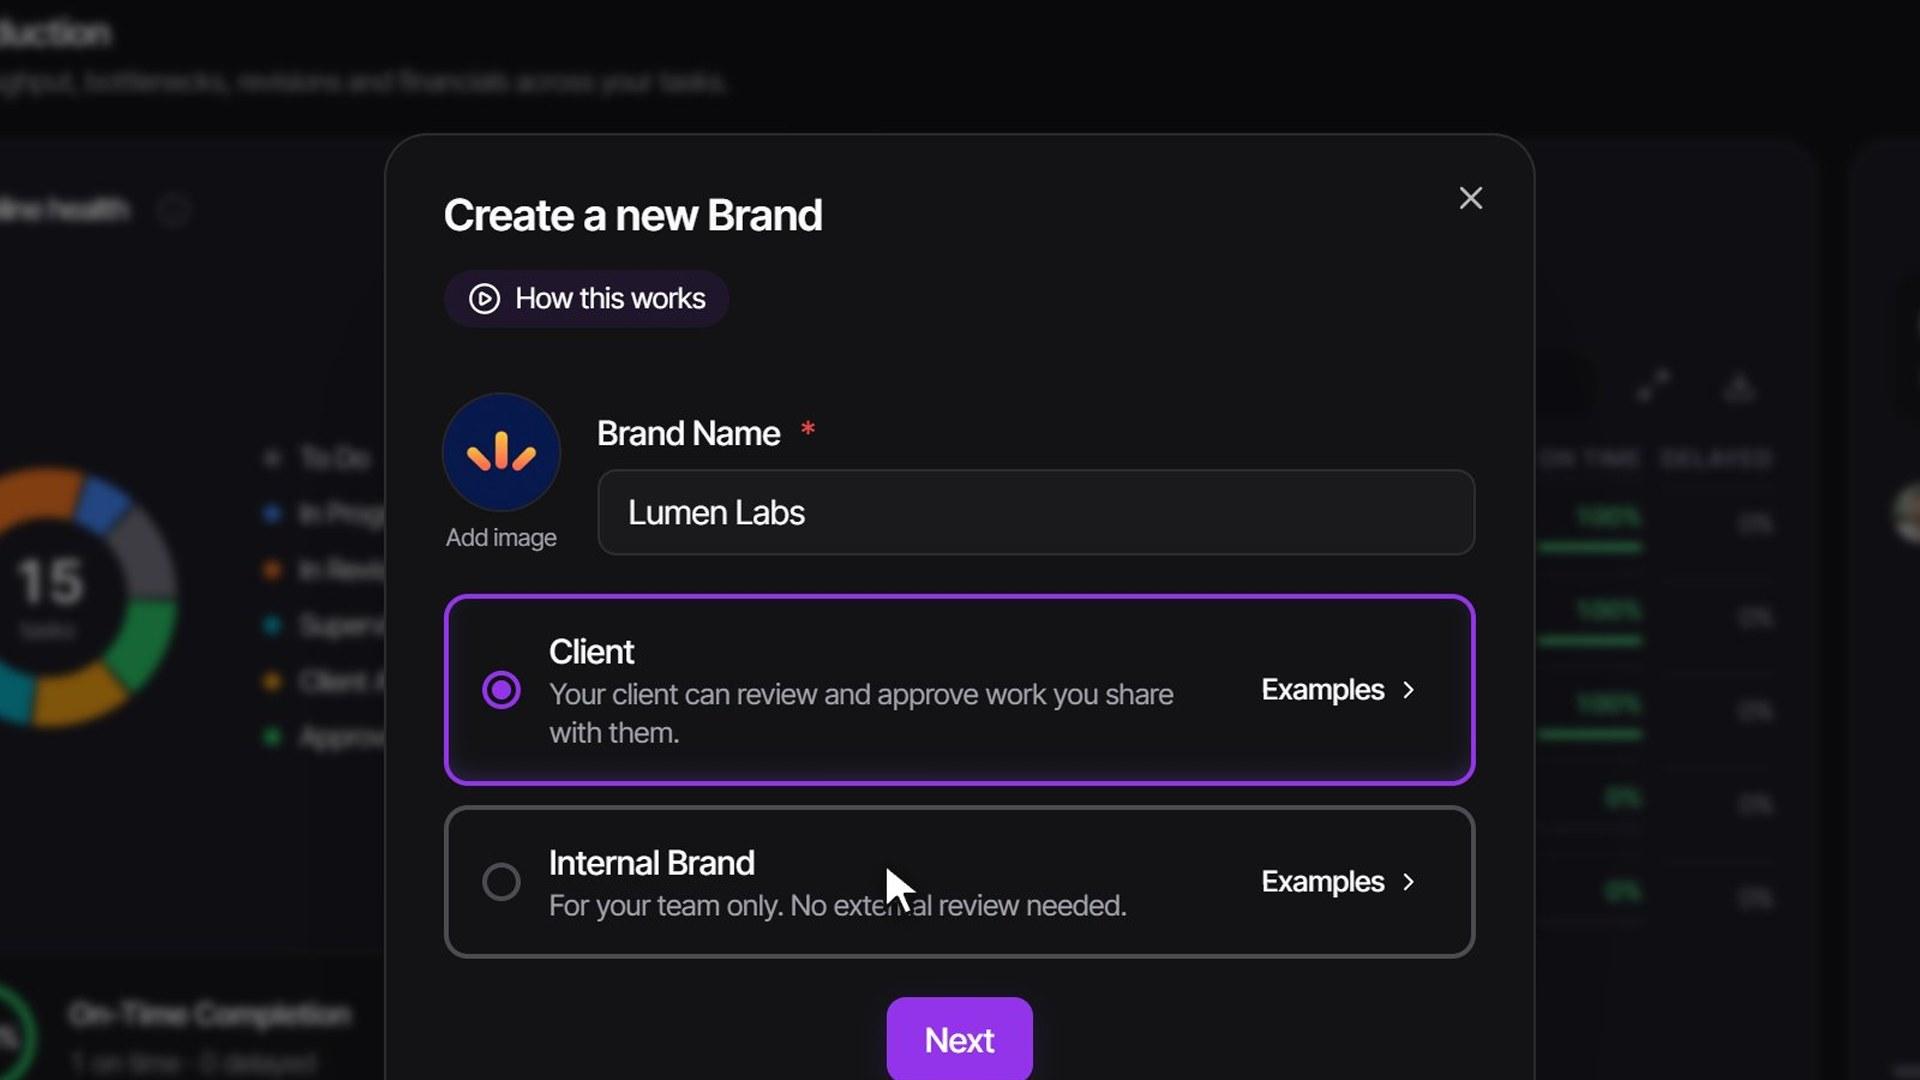
In Timeliner, every client you work with gets their own brand. So, let's create your first one.
Hit the plus, right next to Global View — and choose Brand.
Give it a name — and add their logo, so everything you send them looks like it came from a real studio.
Client means your client reviews and approves the work. Internal is just for your team, like your own social content. This one's a client — so, next.
Now invite the person who approves the videos on their side. Just their email — no account, no password, nothing for them to set up.
Add their name, and send the invite. They get a magic link, and that's how they'll review everything you send.
Last step, your team. Search for the editors who work on this client and add them. Um, only the people you add here can open this brand.
Hit done — and that's it. Your first brand, with your client and your editor already inside.
Next, we'll organize it with projects and folders, so every video has a home.